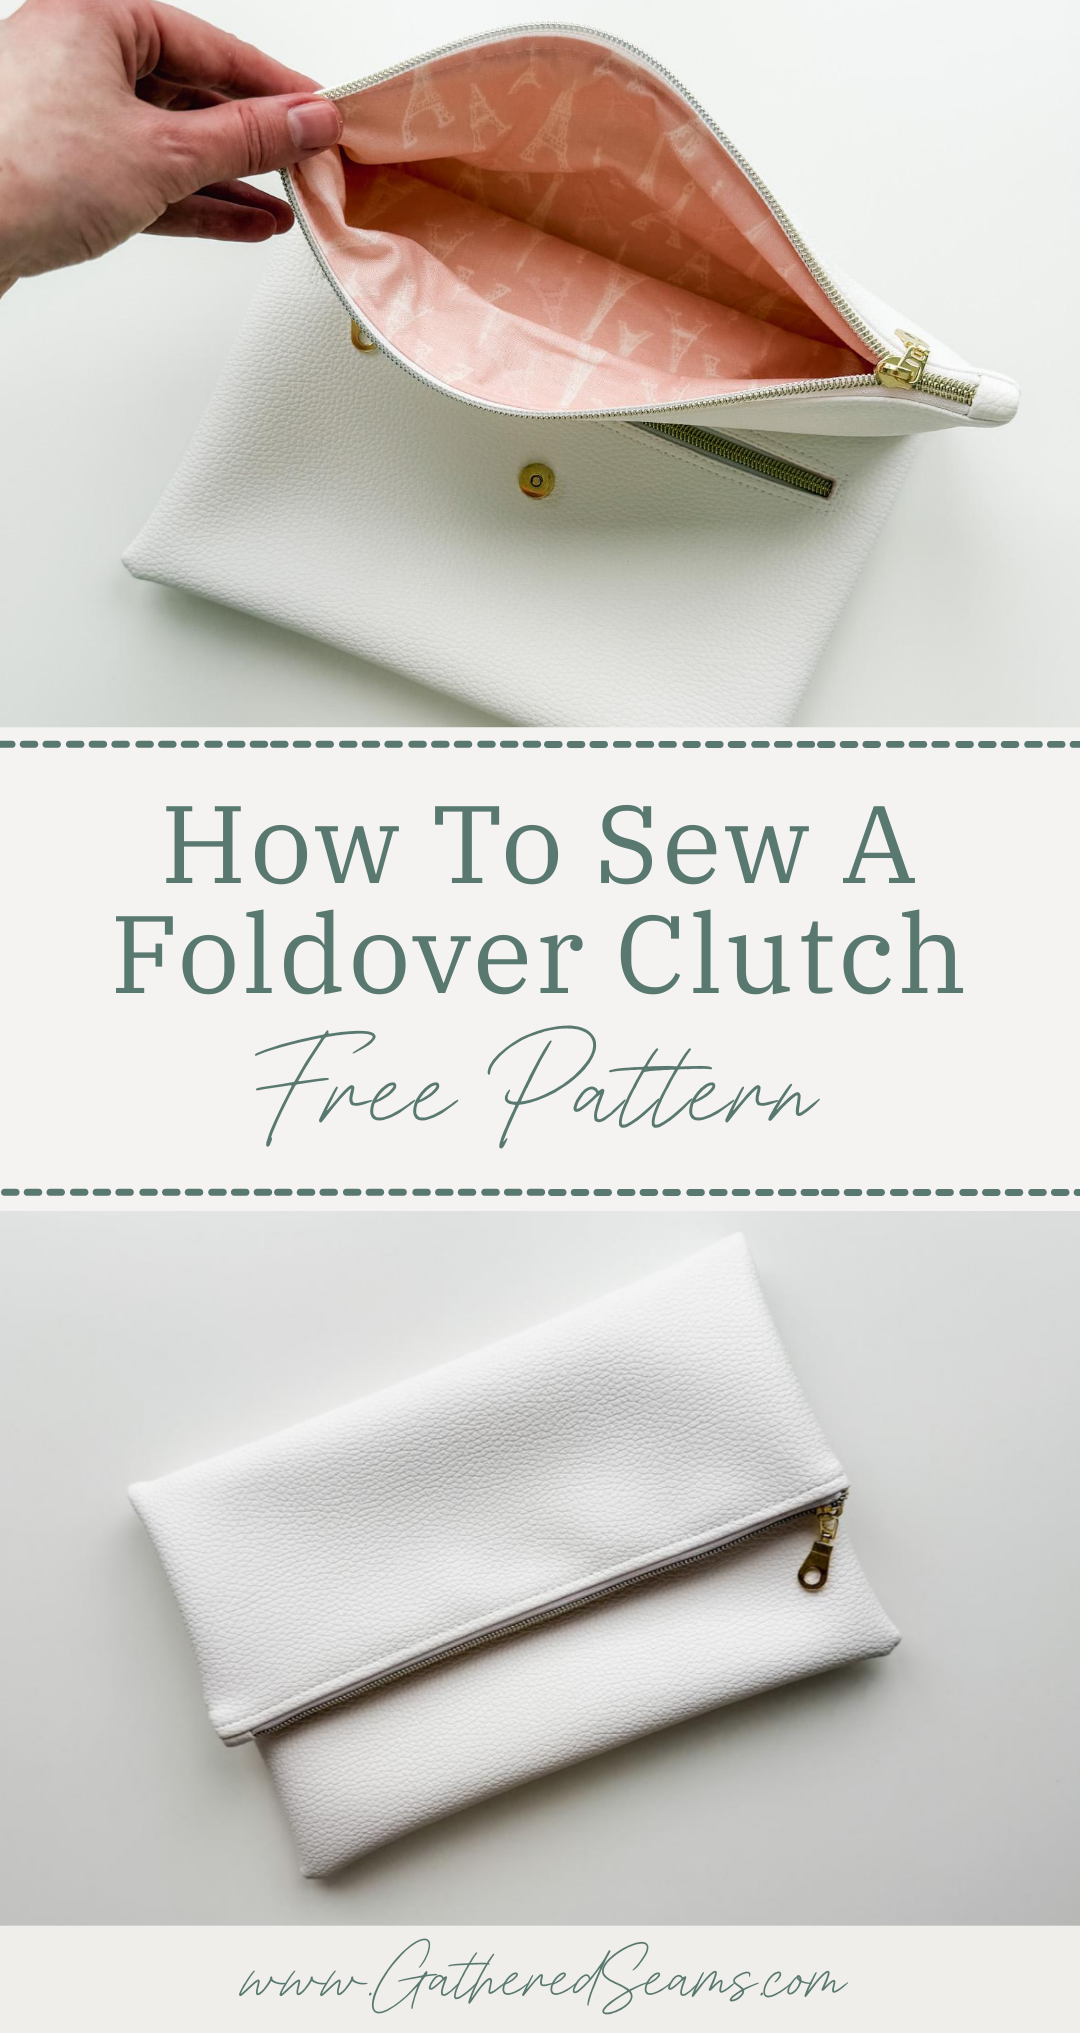
How To Sew A Foldover Clutch | Free Pattern
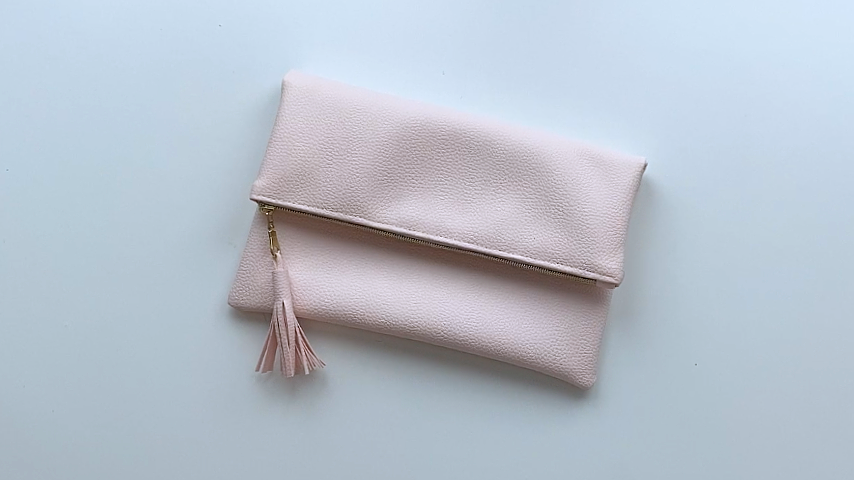
I created this free pattern based on an old clutch I have that has seen better days. This clutch is a simple design with a couple of (optional) features that elevate it.
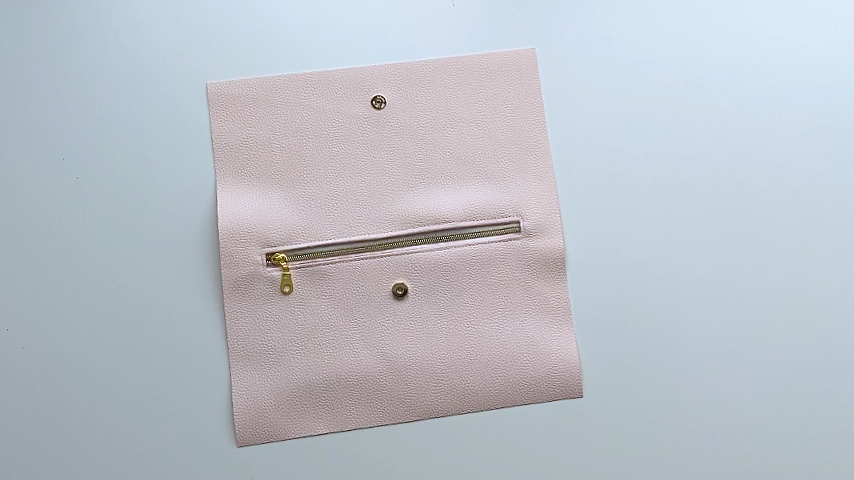
The magnetic snap ensures the fold stays in place, the exterior pocket adds organization, and the tassel adds some design interest. However, for a quicker, simpler design, you can easily skip these features.
You can also add onto this pattern by adding tabs with D-rings that a handle or straps can be clasped onto. You may also want to add interior pockets to the bag.
Sewing this clutch to sell
You can play with different materials to adapt this clutch to your brand. The design would fit well into most bag lines.
You could add a few other items to work with the clutch and increase your units per transaction, such as matching:
- makeup bag (a smaller bag to organize items inside). I personally like keeping my bag essentials in a smaller bag, so when I want to wear a different purse, I can just move the smaller bag to it and know I have everything I need (lip balm, Kleenex, mints, hand lotion, etc.)
- sunglasses case
- credit card case
- coin purse
You could also adapt the tassel to have a clasp on the end and sell it separately as an add-on.
Another way to adapt this bag is to add D-rings just below the fold so a strap can be clasped on, turning it into a purse. You could add 2 D-rings on either size of the clutch for a longer shoulder/crossbody strap, or just one D-ring on one side to clasp on a wristlet strap.
Materials
- Exterior fabric – these instructions are for a vinyl exterior. You can use other fabrics but they should be heavier-weight so it feels sturdy in the hands and doesn’t flop down.
- Lining fabric
- Thread
- #5 zippers
- Magnetic snap
Tools
As an Amazon Associate, I earn from qualifying purchases (see full disclosure here).
- Sewing machine
- Walking foot (highly recommended if you’re sewing with vinyl or when quilting. This is the universal one I purchased for my Baby Lock, which is a different machine than what’s shown in the photos)
- Clips
- Strong fabric glue (for tassel)
- Temporary fabric marker (these are the ones I use)
- Ruler
- Rotary cutter
- Scissors
- Point turner
- Wonder Tape (optional but makes sewing in zippers easier)
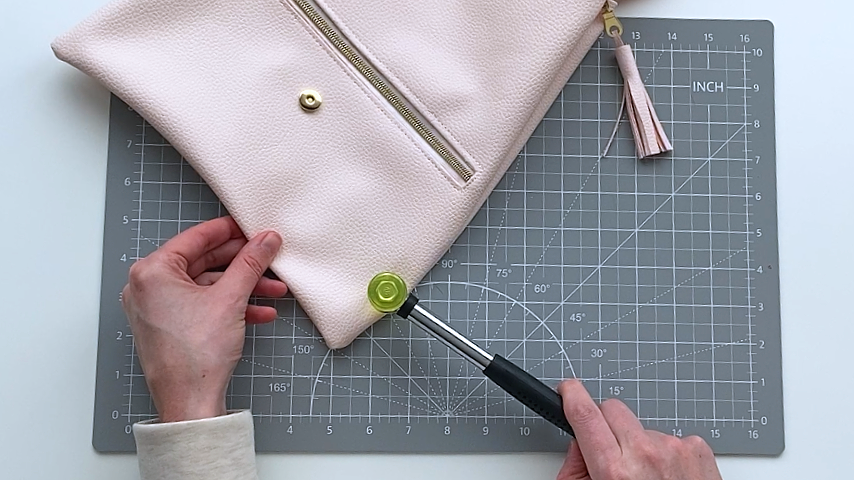
- Soft-faced hammer (optional, but helps flatten seams when working with vinyl)
Step 1
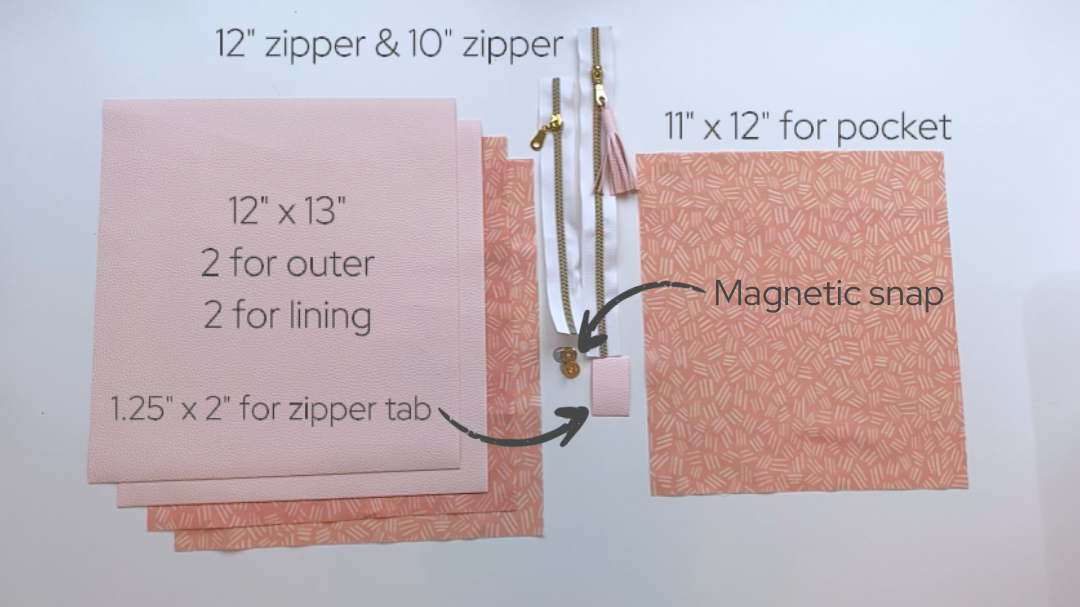
Cut out your pieces of fabric and zipper according to my pattern:
Vinyl:
- 2 pieces that are 12″ wide by 13″ tall
- 1 piece that is 1-1/4″ x 2″ (for the zipper tab)
Lining fabric:
- 2 pieces that are 12″ wide by 13″ tall
- 1 piece that is 11″ wide by 12″ tall
#5 zipper:
- 12″ long (for the top of the bag)
- 10″ long (for the front pocket)
Other:
- 1 magnetic snap (I used 14mm snaps)
Step 2 (optional)
There are many ways and tools you can use to make a tassel. I’m sharing a simple method that doesn’t require any hardware.
This step is easier to complete before you add your zipper to the bag. However, you must be mindful of where the tassel is when sewing to ensure it doesn’t get sewn into a seam.
Cut a piece of vinyl that is:
- 3″ tall by 3-1/2″ wide
- 1 piece that is 7″ tall and 1/8″ wide (or as wide as you’re going to cut your tassels)
Use a temporary fabric marker on the back of your strip to mark a line 1/2” from the top of your tassel (the top is the longer edge).
Cut strips about 1/8” wide along the length of your tassel, stopping at the line that is 1/2″ away from the top.
These cuts don’t have to be perfect, but you can mark them on the back of your vinyl if you want them to be perfectly even.
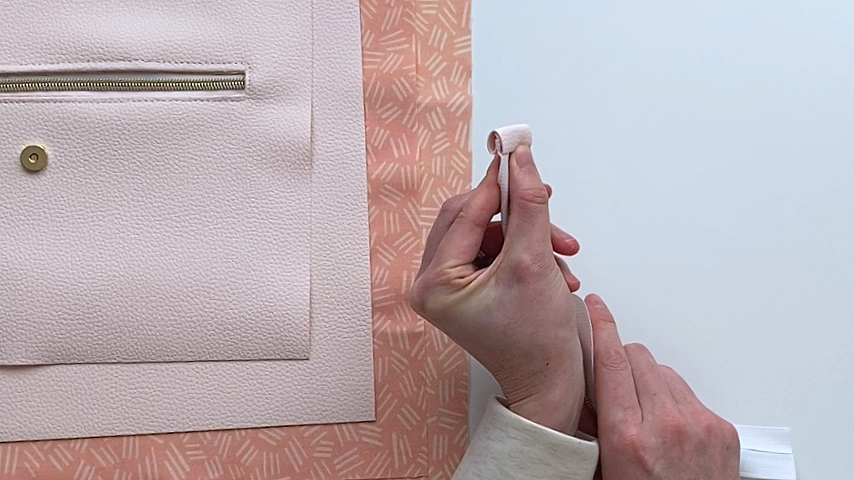
Line the longer single tassel up with the bottom of your fringe, then loop it through your zipper pull and fold it back down so the other end of the strip lines up with the bottom of the tassel. Add a dab of glue within that 1/2” uncut area to close the loop.
Then run glue within the uncut area and tightly roll your tassel.
Use a clip or painters’ tape to keep the tassel tightly rolled while the glue dries. I prefer painters’ tape as it doesn’t squish the top of the tassel as the glue dries.
Step 3
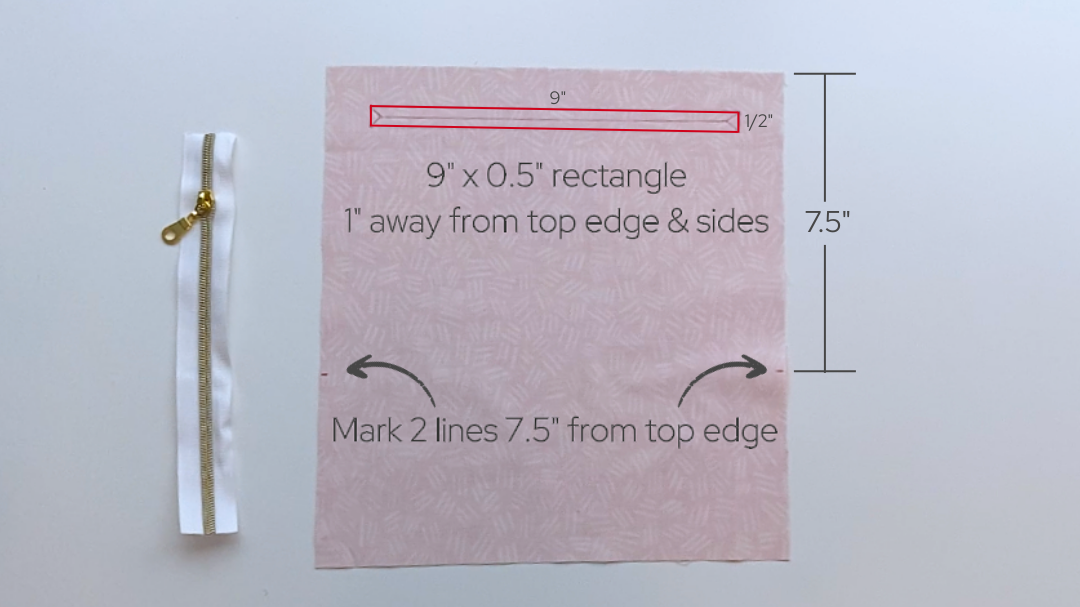
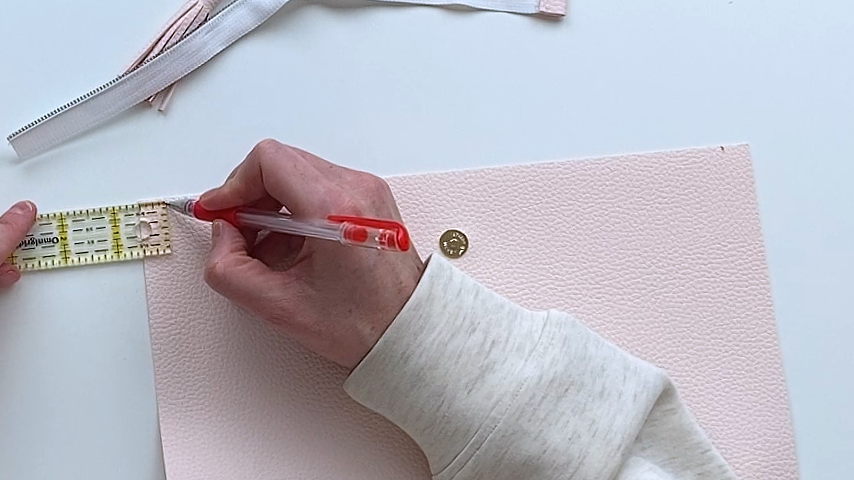
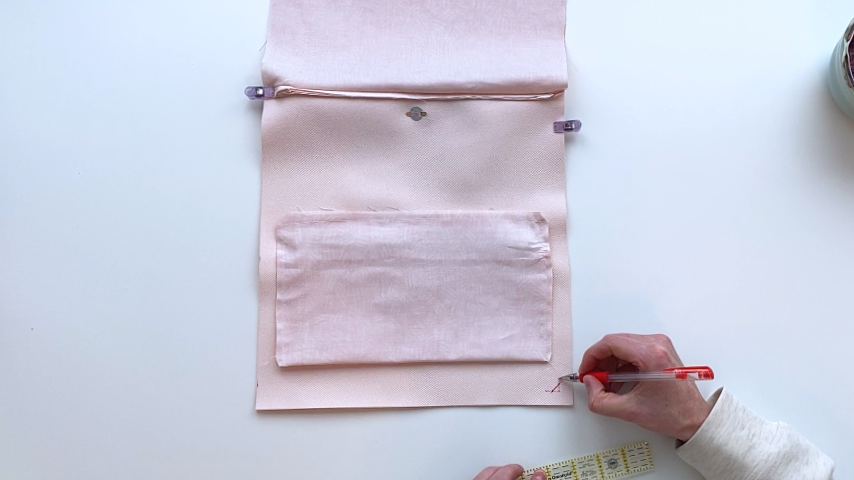
Use a temporary fabric pen to draw a rectangle on the back of your pocket.
The rectangle should be 1″ from the top and sides of the pocket piece, and be 9″ long by 1/2″ tall.
Remember the pocket piece is 12″ tall and 11″ wide. So your rectangle should run parallel to the 11″ side.
Draw a line down the center of the rectangle y-ing it off at the start and end (these will be your cut lines).
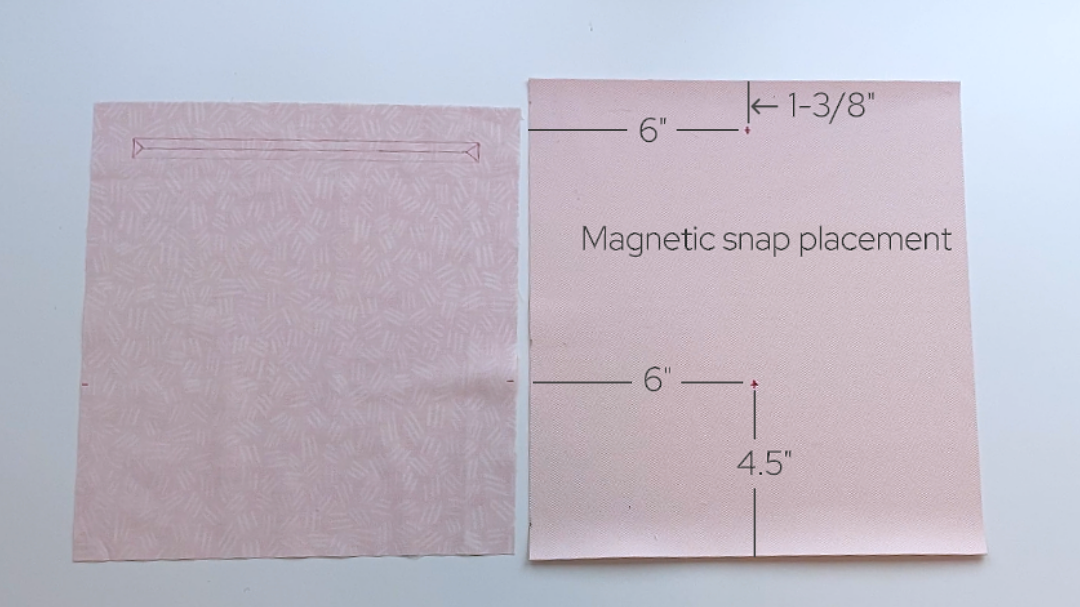
You will also make two marks on the back of your pocket piece that are 7-1/2″ from the top.
Lastly, mark the center points of your magnetic snaps. These will go on the same piece of vinyl that your pocket is being added to.
These should be placed:
- Top: 6″ in and 1-3/8″ down
- Bottom: 6″ in and 4-1/2″ up
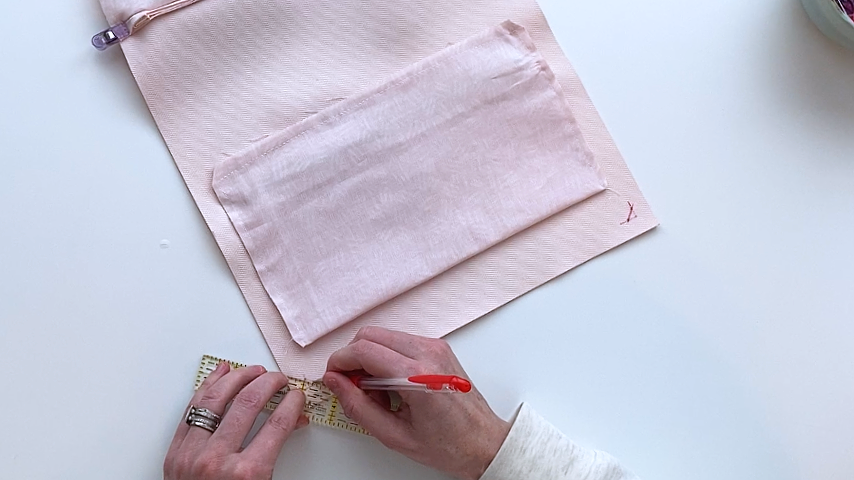
Place the right side of the pocket to the right side of the vinyl (the one with the magnetic snap markings). The pocket should go on the bottom half of your vinyl piece.
Center the pocket width-wise on your vinyl piece and line up the 7-1/2″ markings on your pocket with the bottom of the vinyl piece.
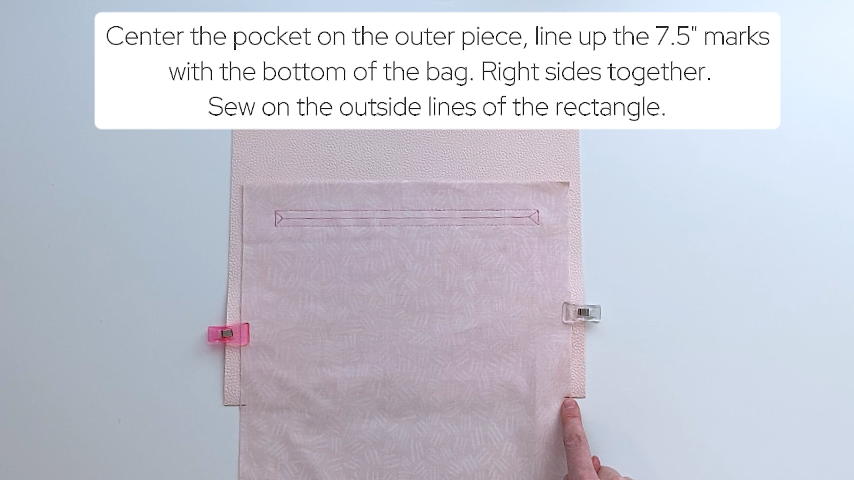
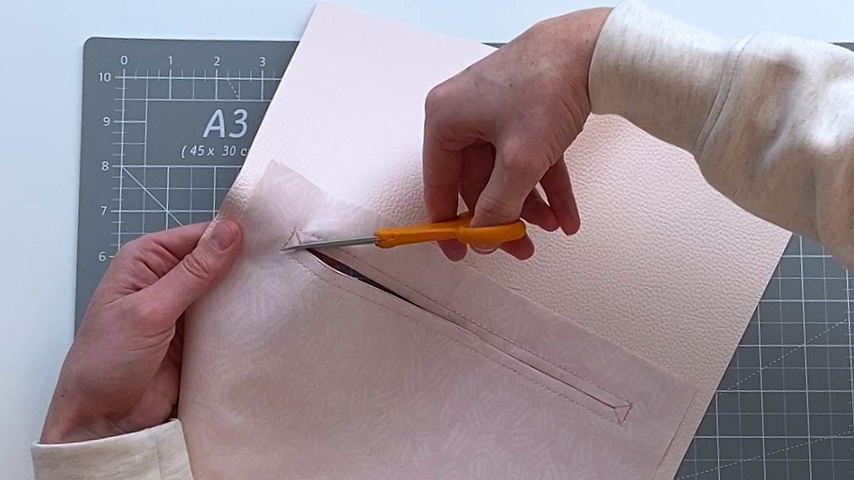
Now sew on the line, all around the rectangle (do not sew down the center lines).
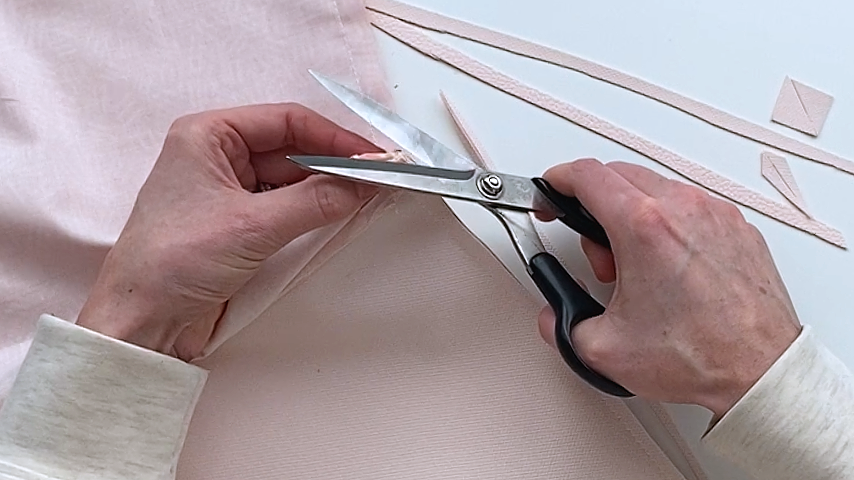
Use a rotary cutter and the tip of your scissors to cut along the middle cut lines.
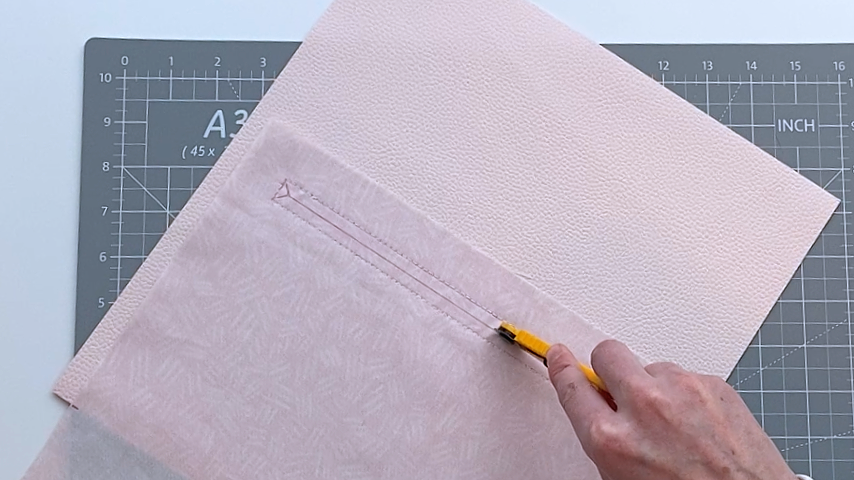
Push the lining fabric through that cut-out and pull it tight around the rectangular opening so the lining sits flat.
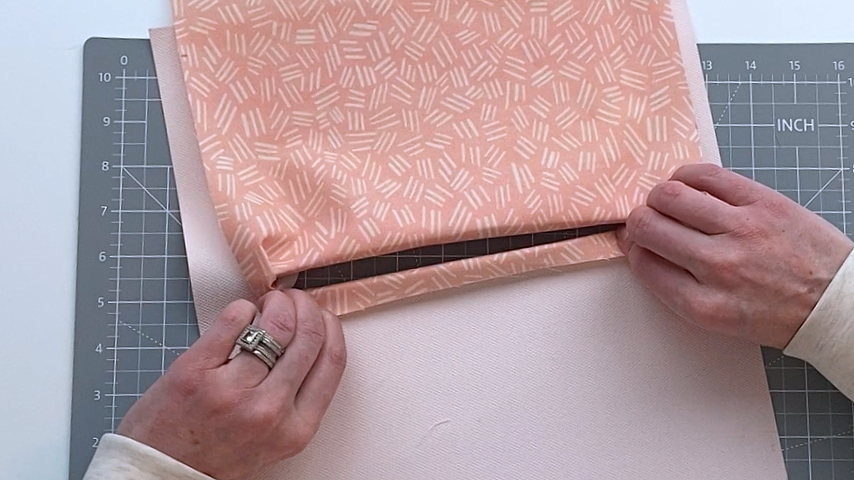
You can press (using a pressing cloth and low heat), use a hammer to get the seams to lay flat, or use Wonder Tape to keep the lining in place.
Center the zipper in the opening (use Wonder Tape to keep it in place) and sew around the rectangle to stitch the zipper into place.
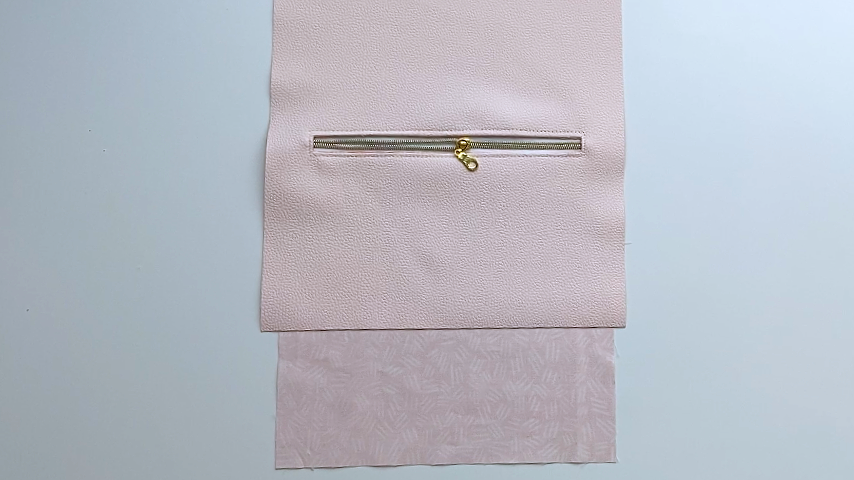
Now you can fold the pocket lining so the bottom edge meets the top edge, right sides together. Sewing just the lining (not the outer fabric), stitch along the top edge and down each side. Simply fold the vinyl back and out of the way as you sew each edge.
To finish off the front panel of the clutch, add your magnetic snaps.
Step 4
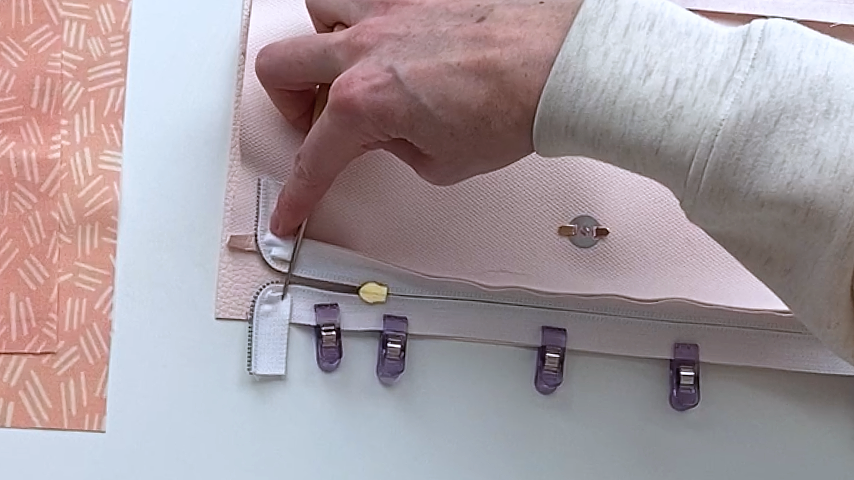
Take your 1-1/4” x 2” piece of vinyl and sew it right side to the end of your zipper, using a 1/2” seam allowance. Make sure you’re sewing it to the end of the zipper that should stay closed (not the opening end of the zipper).
Then fold the other end of the tab under by 1/2” and fold it over the end of the zipper. Top stitch the tab to secure the underside of it in place.
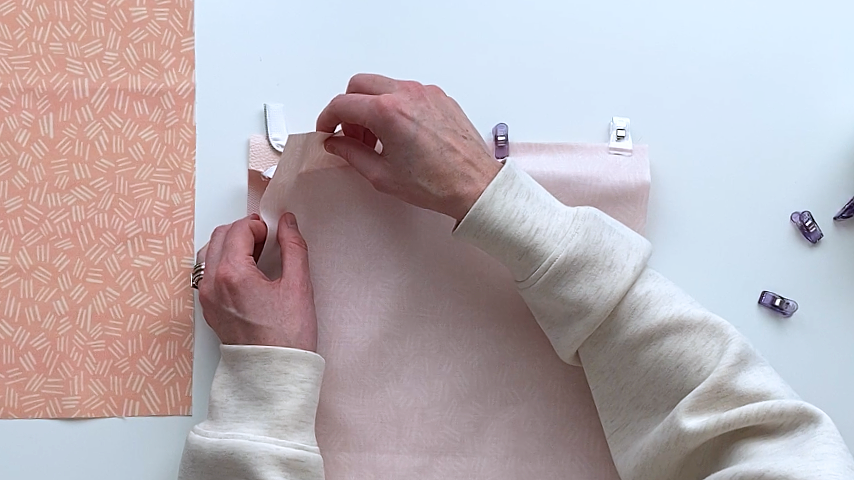
On the right side of your vinyl pieces, mark your seam allowance on either side of the top edge. Your zipper must fit within these lines.
With right sides together, line the end of the zipper tab up with the 1/2″ seam allowance mark. Make sure your zipper is opening in the right direction (if you’re looking at the panel with the magnetic snaps and pocket, I like my zipper to open to the left).
Clip the zipper into place, and when you get to the end with no zipper tab, bend your zipper at a 90-degree angle and clip into place; making sure it ends right before the 1/2″ seam allowance mark.
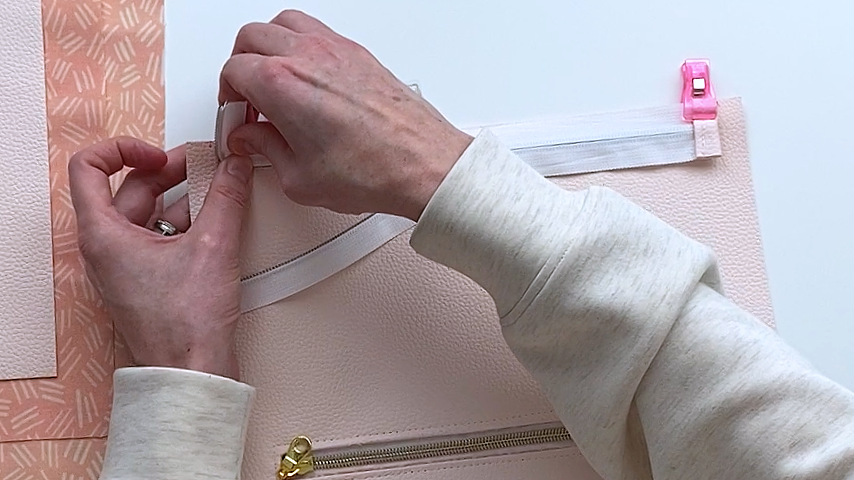
Baste the zipper to the vinyl.
Place the lining on top of the zipper so the lining and vinyl fabric are right sides together, and the zipper is sandwiched between them.
Using a zipper foot, sew from one end to the other, about 1/8” away from the zipper.
At the 90-degree end of the zipper, cut off any excess so it doesn’t extend past the edge of the purse.
Topstitch along the zipper, starting and ending where your zipper starts and ends (so you’re not topstitching in the seam allowance).
Repeat these steps to secure the zipper to the back panel and the other piece of lining.
Step 5
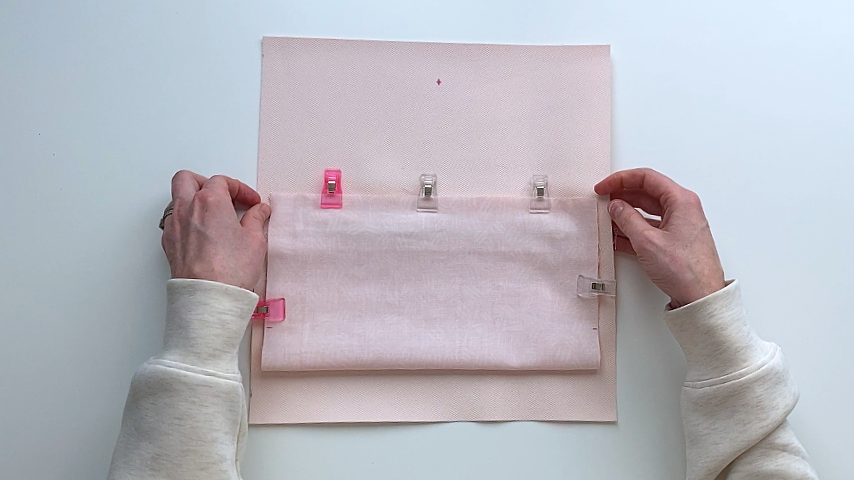
Place your front panel and back panel right sides together, and clip them together.
Line up your front and back lining pieces, right sides together and clip.
Use a temporary fabric marker to mark a 4 – 5” opening along the side of your lining (big enough so you can fit your hand through the opening). You will not sew between those two lines.
I also like to mark angled corners as I find it gives a cleaner look when the bag is turned right side out.
Sew around the outside edges. For the outer pieces, I use a 1/2” seam allowance.
As I transition to the lining, I taper my seam allowance to a 5/8” seam allowance.
And then I taper my seam allowance back out to 1/2” before I reach the outer pieces again.
It’s best to use a zipper foot for this step so you can sew close to the ends of your zipper (but not sew over them).
Step 6
Before turning the bag right side out, press the hem of the opening (which will make it easier to sew closed once the bag is right side out).
Also, trim down your seam allowance and cut the corners at an angle. I also clip the seam allowance at either end of the zipper, cuting at an angle.
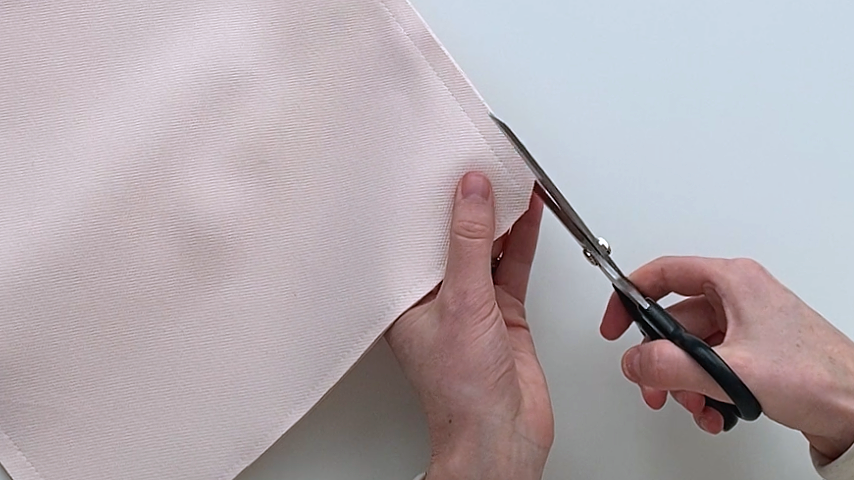
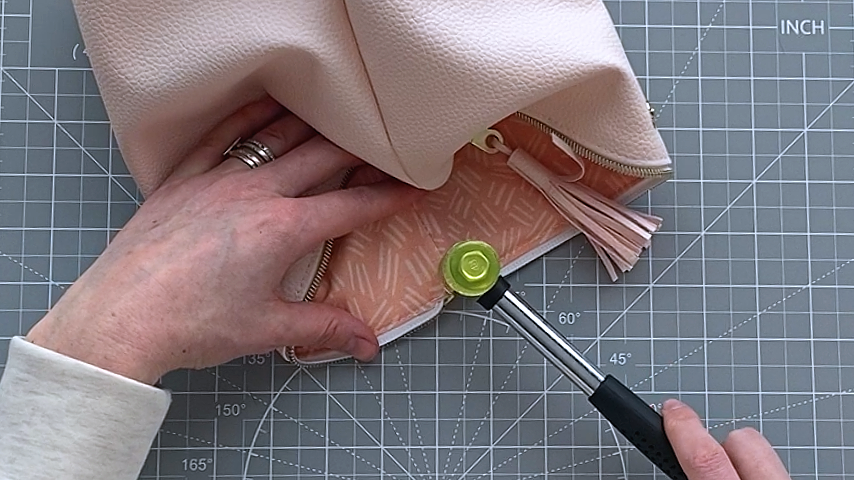
Turn the bag right side out and use a point turner (or chopstick or knitting needle) to push the corners out.
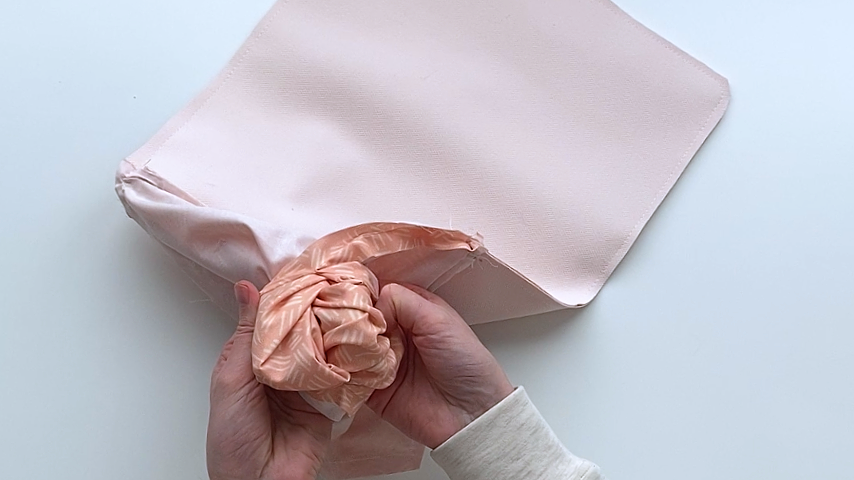
Sew the opening in the lining closed.
To flatten the seams, use a pressing cloth and iron on a low setting (then a clapper to press the seams in place while they cool) or a soft-faced hammer.